Pressure Canning Ground Beef Made Easy
Learn all about canning ground beef so that you can have meat ready to go at a moment’s notice straight out of your pantry. Talk about convenience!

If you have ever had a freezer door left open after the kids grab a popsicle, then you know how catastrophic it is to lose a freezer full of meat. Maybe you are just running out of freezer space. Or maybe you want food available to eat at a moment’s notice. Whatever the reason is, the next time you get bulk meat, you can take that raw ground beef and run it through a canning process to make it shelf-stable! This is not just for cow meat either. Ground venison, pork, lamb, chicken and many other meats can be turned into canned meat using a pressure canner. Since meat is a low-acid food, you will not want to do this water bath canning.
Once your canned ground beef has finished, you will have a long shelf life of meat that you can conveniently grab to put into your sloppy joes, tacos, chili, spaghetti sauce, and more. Just heat up the meat and you’re ready to go!
This post may contain affiliate links which I would receive a small commission at no additional cost to you. Please read disclaimer and privacy policy for full disclosure.
Canning Supplies
- Large skillet or Roaster
- Pressure Canner
- Jars & New Lids
- Canning Funnel
- Bubble Removing Tool
- Jar Lifter
- Clean Towels
Ingredients Needed for Canning Beef
- Beef
- Water or Beef Broth
- Salt or Spices (optional)
Preparing the Canning Meat
When pressure canning ground beef, it’s important to brown the meat first. As you cook up the meat, make sure you break up as many large chunks as possible. If you don’t do this, the meat can basically turn into giant clumps during the canning process. Do not cook the meat all the way through as it will continue cooking inside of the jar in the pressure canner. Cook the meat until it is about 70% of the way cooked through.

While the beef is cooking, you can prepare your canning jars and pressure canner. Place the jars into the pressure canner, add the few inches of water, turn on the stove, and let them warm up that way. Since canning ground beef is a hot pack method, you will need to remember, hot food goes into hot jars goes into hot water. You never want to add hot food to a cold jar or a cold jar to hot water as it will cause the jar to break.
Since we are hot packing this meat, this is also the time to warm up the liquid you will be using to a boil. Beef broth will add more flavor, but water works great.
Once the beef is cooked, drain the excess fat off. Too much fat can prevent a seal.

Filling Jars with Ground Beef
Fill hot jars up with cooked ground beef to one inch of headspace, at about the lower end of the neck of the canning jar. Use a bubble remover to push down the meat so you can add in more.

If adding in any salt or spices, do so now. A teaspoon of salt for a quart jar. 1/2 tsp for pint jar. Optional.
Pour hot water or broth into jar, leaving 1-inch headspace.

Using the bubble removing tool, remove air bubbles by running the tool down the sides of the jar. Add more liquid if needed to get the correct headspace.
Grab a paper towel or clean cloth, dip into vinegar or water and clean the rims of the jars.

Place jar lid on top and screw bands on finger tight.

Canning Ground Beef
Place jars of ground beef into pressure canner.

Once all jars are in pressure canner and one to two inches of water is in bottom of pressure canner, add the canner lid without the weight and wait for it to start steaming out of the vent pipe.

Once steam is escaping, set a timer for ten minutes. When the ten minutes is up, add the weighted gauge with the correct pounds of pressure (where I live, it is 10 pounds) and allow the canner to come up to pressure. Depending on the type of pressure canner you use and what your altitude is will determine your pound rate.

As soon as your at the correct pressure, you can start the processing time. Process quart jars for 90 minutes and pint-sized or half-pint jars for 75 minutes.
Once the processing time is up, turn of the heat and wait for the canner to come down naturally. When it is at zero pounds of pressure, remove the gauge and wait a few more minutes.
Remove the lid, away from face. Place the jars of meat on a towel on the counter and just let them sit until the next day.

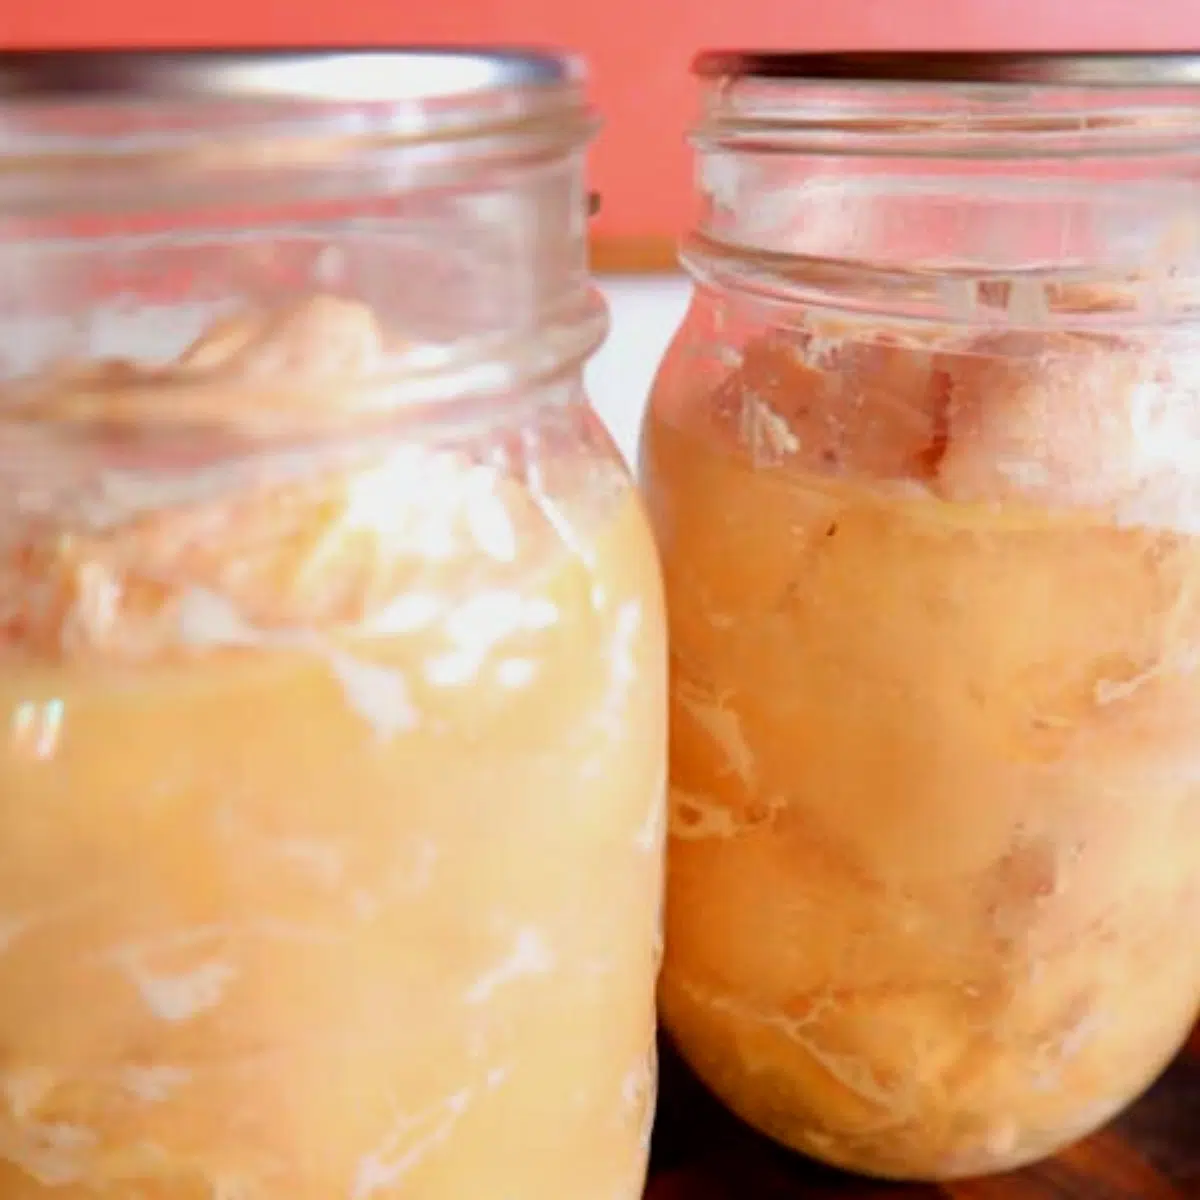
After 24 hours, remove the bands and check the seals. If any are unsealed, place in the fridge to use soon. The contents of the jars should have a layer of fat at the top of the jar, that’s a good thing.
Wash any grease off the jars and store in a cool, dark place for long term storage. For best eating quality, eat within one year.

Tips for Canning Ground Beef
- Be prepared for the final product to look unappealing. Even though it isn’t as pretty as canning pickles, it’s still good!
- Approximately one pound of ground beef fits into one pint jar, therefore about two pounds will fit into a quart jar. If you have a large family, you may want to can in quart jars depending on how much your family eats. We have a family of 8, but, sometimes, I still choose to can ground beef in pint jars.
- Remove as much of the grease as you can before placing ground meat into canning jars.
- Wide mouth jars are easier to get the beef out of. However, regular mouth jars work too. It’s just a little more work.
- You don’t want to raw pack ground beef because it will just end up being one big clump.
Other Options
You can make meal time go much faster by canning seasonings and other ingredients with the cooked meat. Stay away from sage and thyme when canning though, the process can turn them bitter. Try these options to make home food preservation more fun and delicious:
- Adding taco seasoning can make a jar of taco meat ready to go.
- Adding tomato sauce, basil, and garlic can make a great, quick spaghetti sauce. Cook up some noodles and open your canning jar for a 15 minute meal!
- Adding tomato sauce, tomato paste, oregano, basil, garlic, and italian seasoning can make pizza sauce.
- Add some veggies in with the meat for a quick dump option for a casserole.
- Instead of grounding up the beef, form the meat into patties for hamburger night.
Print Canning Ground Beef Here
Canning Ground Beef

Learn all about canning ground beef so that you can have meat ready to go at a moment's notice straight out of your pantry. Talk about convenience!
Ingredients
- Beef - 14 pounds
- Water or Beef Broth
- Salt or Spices (optional)
Instructions
Preparing the Canning Meat
- When pressure canning ground beef, it's important to brown the meat first. As you cook up the meat, make sure you break up as many large chunks as possible. If you don't do this, the meat can basically turn into giant clumps during the canning process. Do not cook the meat all the way through as it will continue cooking inside of the jar in the pressure canner. Cook the meat until it is about 90% of the way cooked through.
- While the beef is cooking, you can prepare your canning jars and pressure canner. Place the jars into the pressure canner, add the few inches of water, turn on the stove, and let them warm up that way. Since canning ground beef is a hot pack method, you will need to remember, hot food goes into hot jars goes into hot water. You never want to add hot food to a cold jar or a cold jar to hot water as it will cause the jar to break.
- Since we are hot packing this meat, this is also the time to warm up the liquid you will be using to a boil. Beef broth will add more flavor, but water works great.
- Once the beef is cooked, drain the excess fat off. Too much fat can prevent a seal.
Canning Ground Beef
- Fill hot jars up with cooked ground beef to one inch of headspace, at about the lower end of the neck of the canning jar. Use a bubble remover to push down the meat so you can add in more.
- If adding in any salt or spices, do so now. A teaspoon of salt for a quart jar. 1/2 tsp for pint jar. Optional.
- Pour hot water or broth into jar, leaving 1-inch headspace.
- Using the bubble removing tool, remove air bubbles by running the tool down the sides of the jar. Add more liquid if needed to get the correct headspace.
- Grab a paper towel or clean cloth, dip into vinegar or water and clean the rims of the jars.
- Place jar lid on top and screw bands on finger tight.
- Place jars of ground beef into pressure canner. Once all jars are filled, add the canner lid without the weight and wait for it to start steaming out of the vent pipe.
- Once steam is escaping, set a timer for ten minutes. When the ten minutes is up, add the weighted gauge with the correct pounds of pressure (where I live, it is 10 pounds) and allow the canner to come up to pressure. Depending on the type of pressure canner you use and what your altitude is will determine your pound rate.
- As soon as your at the correct pressure, you can start the processing time. Process quart jars for 90 minutes and pint-sized or half-pint jars for 75 minutes.
- Once the processing time is up, turn of the heat and wait for the canner to come down naturally. When it is at zero pounds of pressure, remove the gauge and wait a few more minutes.
- Remove the lid, away from face. Place the jars of meat on a towel on the counter and just let them sit until the next day.
- After 24 hours, remove the bands and check the seals. If any are unsealed, place in the fridge to use soon. The contents of the jars should have a layer of fat at the top of the jar, that's a good thing.
- Wash any grease off the jars and store in a cool, dark place for long term storage. For best eating quality, eat within one year.
Pin Canning Ground Beef for Later

This post may contain affiliate links which I would receive a small commission at no additional cost to you. Please read disclaimer and privacy policy for full disclosure.