Pressure Canning Green Beans for Beginners
Pressure canning green beans is a great way for beginner’s to learn the canning process. If this is your first time canning (or even your 100th) follow this easy yet complete guide to home-canned green beans.

If you have never pressure canned before, don’t worry. It’s not as scary as it was many years ago. Modern day pressure canners have so many safety devices on them, that home food preservation has never been more safe!
The first thing you need to figure out is hot pack or cold pack? But what does that mean? That is just talking about how you are packing the jars.
Hot packing is warming up or par-cooking the food before placing it into the jar. Cold packing (AKA raw packing) is just placing the food straight into the canning jars raw, with no precooking.
So, which way should you pressure can your own green beans? Well, ultimately, the choice is up to you. However, if this is your first time pressure canning, I suggest the raw-pack method.

This post contains affiliate links, which means I make a small commission at no extra cost to you. See my full disclosure here.
Pressure Canning Green Beans
Before we can begin pressure canning green beans, you’ll have to run out to your own garden (or bulk buy some fresh green beans from a local farmer) and get a bunch of beans. Look for young, tender green beans. Once you have enough raw green beans to do a canner load, wash beans under cold water for a few minutes.
How many green beans to do a canner load?
Pint jars need an average of 9 pounds for 9 pints. Quart jars need an average of 14 pounds for 7 quarts.
In 2023, 20 pounds of green beans gave me 9 pint jars and 14 quarts plus some for fresh eating 2 meals for a family of 8.
Grab all the equipment you will need before starting.
- Pressure Canner
- Canning Jars
- Lids and Bands
- Canning Tools- debubbler, jar lifter, pot holder, etc.
Prepping Canning Jars
Use jars that have been freshly washed in hot soapy water. Be sure to check jars for any nicks or cracks. Keep jars warm by either placing in the oven on 250 degrees F or by placing into the pressure canner with a few inches of water and turning the stove on.
Be sure new lids are washed and rings do not have any rust.
Prepping Green Beans
Once the raw beans have been washed, trim ends off all beans, keeping the bean tips together. Throw the ends into the compost. Be sure there are no soft or weird-colored green beans. At this point, you can leave them long or cut them into bite size pieces, about 1 inch. Rinse green beans clean. Optionally, you can soak green beans in water with a splash of vinegar to clean them.

If you will be using the hot pack method for green beans, put beans into pan and cover with water. Bring to a boil for 5 minutes. You will also need to warm up jars and a pot of water at this point.
Filling the Jars
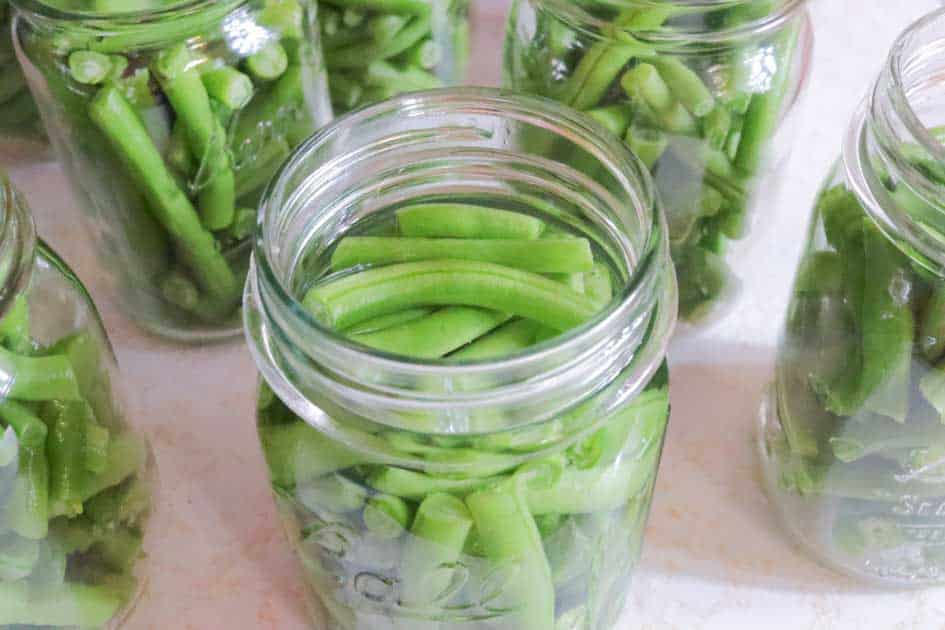
Pack green beans into jars. Once fresh beans have been placed into jar, pack them down a bit, trying to remove any large pockets of air. Fill all the way to the top of the jar, leaving 1-inch headspace. If you are unsure how to check headspace, using a debubbler tool that has a headspace marker on one end is a great little investment.

Add salt to each jar. Pint jars get 1/2 teaspoon salt per jar. Quart jars get 1 teaspoon of salt per jar.

Fill jars with water. (If using hot pack method, remember that hot food needs hot jars which need hot water). Each jar needs to be filled with water up to 1 inch of headspace.

After filling jars, remove air bubbles.

Wipe rim with a paper towel and place canning lid on top of filled jars. Screw bands on.

Place jars on rack in bottom of pressure canner. If you have not added water to pressure canner yet, pour 2 to 3 inches of hot water into it.

Pressure Canning Green Beans
Turn the stove on high heat and place pressure canner lid on.
Wait until steam is coming out of the vent hole and then set a timer for 10 minutes.
Once the ten minutes is up:
In a weighted gauge pressure canner-
Place weighted gauge on at 10 pounds pressure. For those canning at high altitudes, you’ll need higher pressure. When the gauge begins to jiggle, start the processing time. You will probably need to turn heat down at this point too. Every stove is different and you will get to know yours, but for mine, to keep at 10 pounds of pressure, my stove needs to be just under medium heat.

In a dial-gauge pressure canner-
Place the weight on the vent pipe. Once gauge reads 11 PSI, set your processing timer. Do not let the pressure exceed 13 PSI. Turn down the heat a bit if needed.
Process time for quart jars is 25 minutes and pint jars for 20 minutes.
After that time is up, turn off stove. Leave the weighted gauge on. Just walk away and let pressure come down naturally.
When pressure says it is at zero, remove the weight and wait a few more minutes.
After that, it is safe to remove the lid from the pressure canner. However, open the canner lid so it is tilting away from your face so the steam doesn’t burn you.
Remove jars with a jar lifter and place on a clean towel on the counter.
Wait 12-24 hours before touching the jars again.
Now What?
The next day, it is time to check to see if each jar has a good seal. Remove the bands from each jar and push down in the middle of each lid. If you feel any spring-y-ness, place that jar into the fridge and use up in the next few days.
Store sealed jars (without bands on) in a cool dark place.
Congratulations! You have now canned your own food at home! Use the jars of home canned green beans as a side dish, place in a casserole, soup, or any other way you would normally eat store bought canned green beans.
Tips for Pressure Canning Green Beans
- Grow your own green beans or buy from a local farmer if possible. The freshest beans will not only be healthier, but taste better.
- Add other flavorings if you like. Try throwing some garlic and/or onions in with the green beans before canning. Bacon bits are a great addition!
- This will work for any kind of string bean, but not dried beans.
- Harvest, rinse, and store your beans in zipper bags in the refrigerator for a few days until you have enough for a full canner load.
- Green beans are a low-acid vegetable, so water bath canning is not a recommended option, however many “rebel canners” do it. Pressure canning is the USDA recommended way to preserve this vegetable at home.
Save Pressure Canning Green Beans for Later

This post may contain affiliate links which I would receive a small commission at no additional cost to you. Please read disclaimer and privacy policy for full disclosure.


I always wanted to learn how to canning vegetables and your article is an inspiration. Thank you, I want to do some for this winter.
I’m so excited for you! Let me know if you have any questions!